
 The structure was now far more robust, and the effort required to push the shield flat was now greater. Would one be prepared to go into a life or death or struggle with the shield as it was – most unlikely, so it was decided appropriate to apply a layer of raw-hide to each side.
Application of the raw-hide to the shield
The rawhide parchment used in this project was de-limed but not tanned. Although the de-liming process will stabilise the material, it only becomes leather when it has undergone the full tanning process [4] which converts the rawhide parchment to a more durable material by chemically altering the structure of collagen fibres that lie just beneath the outer skin.[5]
 |
| Rolling up the rawhide (1) |
Having acquired two hides of de-limed parchment (rawhide) it was found that the shoulders of the rawhide proved tougher to cut than the actual body. It was not clear if this was to do with the nature of the skin or the curing and stretching process.
Having determined how much would be needed to cover side 'A' of the shield, allowing for a 2 inch (50mm) overlap, then having cut it out of the hide and soaked in warm water for about 15 minutes, just long enough to become supple and workable, there may still be some excess fat, as was the case with this particular raw-hide, to have to scrape away to ensure good adhesion.
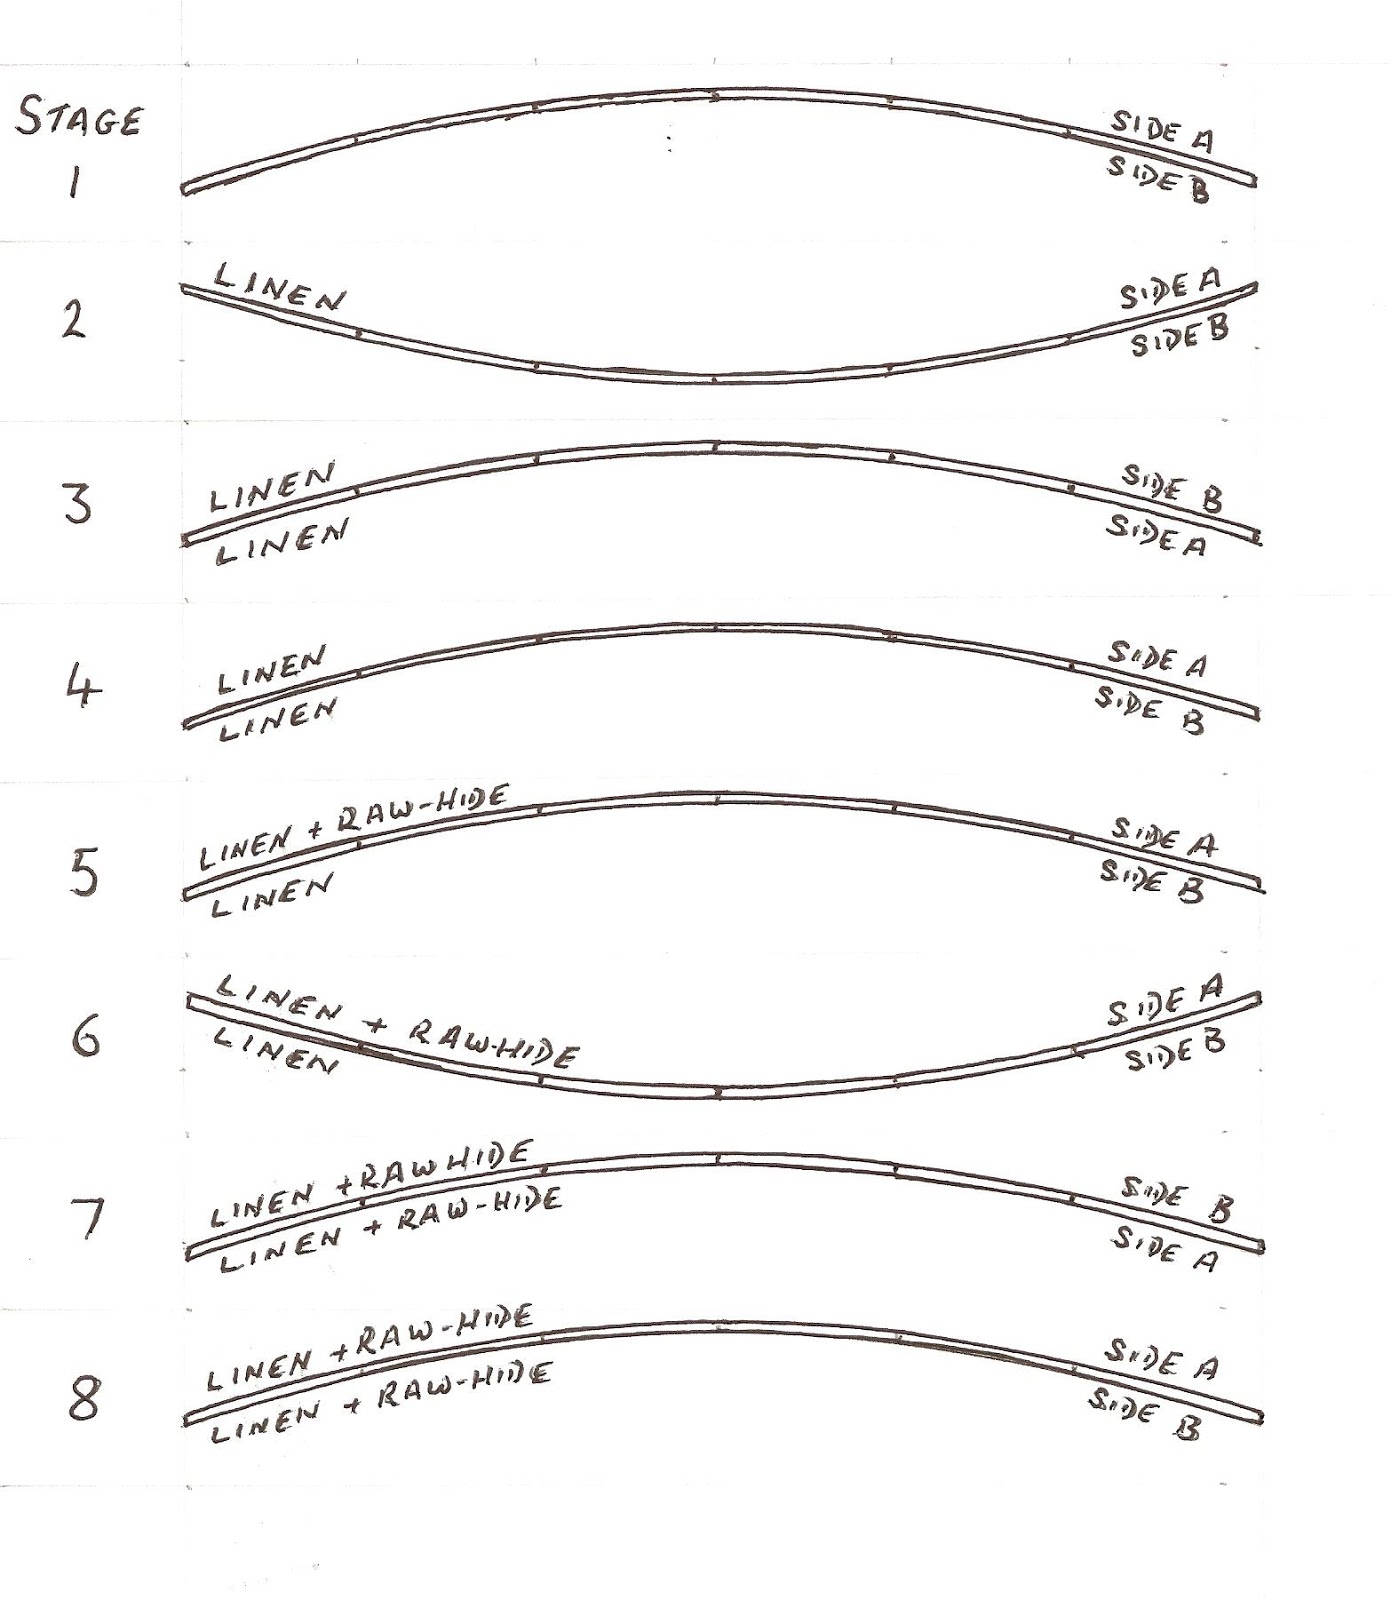 With the excess water removed, first by rolling up the raw-hide to remove most of the water then laid out on a flat surface and the surfaces wiped with a dry cloth, the raw-hide was then laid flat on the work bench, and a liberal amount of hide glue applied to that side (the inside of the skin) that would be placed against side ‘A’. The hide-glue was then rubbed into the skin vigorously for a several minutes to ensure that the skin was impregnated with hide glue and had replaced the water in which the raw-hide had been soaking. That this has been achieved should become apparent when the raw-hide is not so much damp, but sticky. Keeping the raw-hide flat, it was put to one side and the shield quickly placed on the work bench, and the linen surface of side ‘A’ given an application of hide glue. The raw-hide impregnated with hide glue was then placed on to side ‘A’. (Stage 5.)
Raw-hide technically is not leather as the former is a pre-tanned material and only becomes leather when it has undergone the tanning process; either way, both will expand naturally when wet. So when the raw-hide, impregnated with hide glue, was placed on side ‘A’ on the shield there was no need to stretch it, only to smooth it flat with the hands away from the centre towards the edge of the shield which also served to force out any air pockets as if it was wallpaper. Some air pockets were persistent and only disappeared as the raw
-hide dried.
Note: A brush was not adequate for this task as the smoothing process also required some downward pressure to ensure that the raw-hide was in contact with the linen.
 |
| Flattening rig (2) |
When smoothing the raw-hide flat it proved necessary to place some weights on the shield to keep the convex structure flat. This was to some degree problematic because aside from the need to keep the shield flat, where the weights rested on the raw-hide would inevitably prevent that area from drying out.
A compromise was reached by placing two pieces of flat wood about 4 inches square (100 mm square) adjacent to and either side of the hole in the centre, and a third piece of flat wood, about 4 inches wide (100 mm) and 12 inches (300mm) long, spanning the gap and resting on the two pieces of wood. On top of the flat piece of wood was then placed a heavy weight which kept the shield flat. This method minimised the surface area of the raw-hide that was not open to the air and could be moved periodically by moving the weight around the centre allowing the surface to dry without any problems.
When satisfied that everything had been done that could be done to smooth the raw-hide flat and to ensure that there was good adhesion to the linen, the process of pinning the raw-hide to the shield began.
Again using ordinary drawing pins, by working around the shield, locating the drawing pins very near the edge, was enough to secure the rawhide in place for it to dry under tension. If it was allowed to dry without tension, could mean it shrivelling out of shape. The weights being periodically moved to allow the rawhide that had been under the weights to breathe.
 |
| Rawhide pegged in place (3) |
Where the moisture laden raw-hide covered the hole in the centre of the shield, it sagged down creating a small depression. However, as the shield began to dry out this depression grew increasingly shallower and eventually disappeared when the raw-hide was dry and became as taut as a drum. To get the raw-hide this dry took almost three days, by which time I had removed the weights and found that the enormous pull exerted by the raw-hide had, as with the linen, caused dimensional change in that the planks had been pulled up laterally in relation to the longitudinal join of the planks, so that side ‘A’ was concave again.
In terms of adhesion the weak spots were on certain sections of the periphery, where there probably had not been enough glue or contact, but it was nothing that could not be resolved later.
 |
| Binding the hide (4) |
In determining how best to glue the raw-hide at the periphery and ensure that it held, the author suddenly realised that a significant aspect of shield construction had been overlooked.
Archaeological evidence suggests that the edges of shields were reinforced in some way.[1] On the Gokstad shields there are a series of small holes 2 cm in from the edge and at intervals of 3.5 cm around the periphery [2]. Their presence suggests that the edge of the shields had, in some way, been reinforced and held in place – possibly by stitching, but not necessarily so.
 |
| Edge Reinforcement (5) |
Although it would appear that the wooden planks of the Gokstad shields were painted and not faced with any other material [3], it has nevertheless become apparent from constructing this shield that if the holes had been drilled during the first stage of this construction it is argued that they would have been of significant assistance. Because either by binding, or the use of pegs made of wood, horn or metal the linen could have been secured in place; similarly the rawhide, its translucent quality assisting in finding the holes. (image 3.)
The holes could also have facilitated the binding of both sides of the raw-hide securely to the periphery of the shield until the glue had cured (image 4) and in attaching the reinforcement of the edge (image 5).
[1] Dickinson and Harke
[2] Beatson P
[3] Næss, E.M. Education Officer. Museum of Cultural History, University of Oslo
[4] Archer, R (2012) Marcus Gear Limited. Leather /skins retailer.
[5] Waterer, J.W. (1981) Leather and the Warrior ( Written prior to 1977)
___________________________
...to be continued...
(This work is an extract from a paper entitled "The Construction of a Viking Shield" by Anthony C. Lewis BA(Hons) MCFM JP. The full work can be found HERE )